在Node.js应用中使用CouchDB钱包【Hyperledger Fabric开发教程】

当应用与Hyperledger Fabric网络交互时,Fabric节点会首先验证 应用的身份,也就是应用所持有的证书是否允许访问Hyperledger Fabric 网络。在Hyperledger中,这些身份信息保存在钱包中。在这个教程中 我们将介绍如何在应用中使用CouchDB钱包来保存证书和私钥资料。

1、Hyperledger Fabric钱包的类型

有三种类型的钱包:文件系统钱包、内存钱包和CouchDB钱包。

文件系统钱包

文件系统钱包就是一个简单的文件夹,在大多数 情况下这是不错的默认选择。在fabric-samples/balance-transfer 示例中,使用的就是文件系统钱包。当你运行这个示例代码时,它 就会创建一个fabric-client-kv-orgName文件夹并在其中保存所有 需要的Fabric身份资料。该配置定义可以参考orgname.yaml

内存钱包

顾名思义,内存钱包就是暂存在应用内存中的钱包。当运行在受限环境中 或不需要访问文件系统时可以使用这种钱包,例如在浏览器中。需要提醒 的是,这种钱包中的身份资料在应用终止后就没有了。内存钱包的具体文档 可以查看这里

CouchDB钱包

也就是使用CouchDB保存身份资料,在生产环境中这是最常见的选择。

2、Hyperledger Fabric CouchDB钱包

钱包使用两个库来保存证书和私钥:

状态库

状态库用于保存已登记身份的证书,它存储的是一个身份的基本信息:

1
2
3
4
5
6
7
8
9
10
11
12
13
{
"name": "test",
"mspid": "org1",
"roles": null,
"affiliation": "",
"enrollmentSecret": "<ENROLLMENT_SECRET>",
"enrollment": {
"signingIdentity": "<PRIVATE_KEY_NAME>",
"identity": {
"certificate": "<SIGN_CERT>"
}
}
}

注意:signingIdentity指向私钥和公钥在密码学资料库中的保存地址。

密码学资料库

密码学资料库用于保存身份的私钥和公钥。

3、在Hyperledger Fabric应用中启用CouchDB钱包

首先引入Fabric Node SDK提供的CouchDBKeyValueStore库:

1
const CDBKVS = require("fabric-client/lib/impl/CouchDBKeyValueStore.js");

然后设置状态库:

1
2
3
4
5
6
7
8
9
10
let stateStore = await new CDBKVS({
url: "https://<USERNAME>:<PASSWORD>@<URL>",
name: "<DB_NAME>"
});

const Client = require("fabric-client");

const client = Client.loadFromConfig("path of network.yaml");

client.setStateStore(stateStore);

其中:

  • :couchdb的用户名
  • :couchdb的密码
  • :couchdb的URL
  • <DB_NAME>:可选,状态库名。默认的名称为userdb,当指定的状态库 不存在时Fabric Node SDK会自动创建该库

最后设置密码学资料库:

1
2
3
4
5
6
7
8
9
10
const cryptoSuite = Client.newCryptoSuite();

let cryptoKS = Client.newCryptoKeyStore(CDBKVS, {
url: "https://<USERNAME>:<PASSWORD>@<URL>",
name: "<DB_NAME>"
});

cryptoSuite.setCryptoKeyStore(cryptoKS);

client.setCryptoSuite(cryptoSuite);

4、在Balance Transfer示例中使用CouchDB钱包

Balance Transfer 是Hyperledger Fabric官方提供的一个示例代码。

首先按照示例说明启动balance transfer网络,该网络包含:

  • 2个CA
  • 1个SOLO排序节点
  • 2个机构共4个对等节点

启动couchdb的docker镜像:

1
~$ docker run --name couch-userdb -e COUCHDB_USER=admin -e COUCHDB_PASSWORD=password -p 5984:5984 -d couchdb

上面的命令会自动拉取docker hub上的couchdb镜像。

其中CouchDB详情如下:

  • 容器名称: couch-userdb
  • CouchDB用户名:admin
  • CouchDB密码:password
  • URL:localhost:5984

CouchDB连接URL如下:

1
https://<USERNAME>:<PASSWORD>@<URL> https://admin:password@localhost:5984

然后更新balance-transfer示例中的client配置:打开文件/helper.js,更新其中的 getClientForOrg函数:

1
2
3
4
5
6
7
8
9
10
11
12
13
14
15
16
17
18
19
20
21
22
23
24
25
26
27
28
29
30
31
32
33
34
35
36
37
38
39
40
41
42
43
44
45
46
47
48
49
50
51
52
53
54
55
56
57
58
59
60
61
62
63
64
65
'use strict';
var log4js = require('log4js');
var logger = log4js.getLogger('Helper');
logger.setLevel('DEBUG');

var path = require('path');
var util = require('util');

var hfc = require('fabric-client');
hfc.setLogger(logger);

// couchDB config
const CDBKVS = require("fabric-client/lib/impl/CouchDBKeyValueStore.js");

async function getClientForOrg(userorg, username) {
logger.debug('getClientForOrg - ****** START %s %s', userorg, username)
// get a fabric client loaded with a connection profile for this org
let config = '-connection-profile-path';

// build a client context and load it with a connection profile
// lets only load the network settings and save the client for later
let client = hfc.loadFromConfig(hfc.getConfigSetting('network' + config));

// This will load a connection profile over the top of the current one one
// since the first one did not have a client section and the following one does
// nothing will actually be replaced.
// This will also set an admin identity because the organization defined in the
// client section has one defined
client.loadFromConfig(hfc.getConfigSetting(userorg + config));

//********************** CouchDB configuration **************************************
// set the state store
let stateStore = await new CDBKVS({
url: "https://<USERNAME>:<PASSWORD>@<URL>",
name: "<DB_NAME>"
});

client.setStateStore(stateStore);

// set the cryto store
const cryptoSuite = hfc.newCryptoSuite();

let cryptoKS = hfc.newCryptoKeyStore(CDBKVS, {
url: "https://<USERNAME>:<PASSWORD>@<URL>",
name: "<DB_NAME>"
});

cryptoSuite.setCryptoKeyStore(cryptoKS);

client.setCryptoSuite(cryptoSuite);

//********************** CouchDB configuration END **************************************

if (username) {
let user = await client.getUserContext(username, true);
if (!user) {
throw new Error(util.format('User was not found :', username));
} else {
logger.debug('User %s was found to be registered and enrolled', username);
}
}
logger.debug('getClientForOrg - ****** END %s %s \n\n', userorg, username)

return client;
}

我们的修改如下:

  • 13行:Import the CouchDBKeyValueStore….
  • 31–52行: 设置状态库和密码学资料库

在上面的代码中还有一个小改动:

1
2
3
4
5
// Client variable is used as hfc
var hfc = require("fabric-client");

// Instead of Client
const Client = require("fabric-client");

然后在balance transfer中注册一个新的用户,一旦注册成功,就可以 使用couchdb的api查看状态库和密码学资料库了。

例如,可以使用下面的参数注册一个用户。对于org1,我们使用同一个 库org1db用于状态库和密码学资料库:

  • Name: alice
  • Org: org1
  • DBNAME: org1db
  • CouchDB URL: http://admin:password@localhost:5369

打开浏览器访问http://localhost:5369/org1db/_all_docs,可以看到 在org1db中保存的所有文档。

Fabric CouchDB钱包

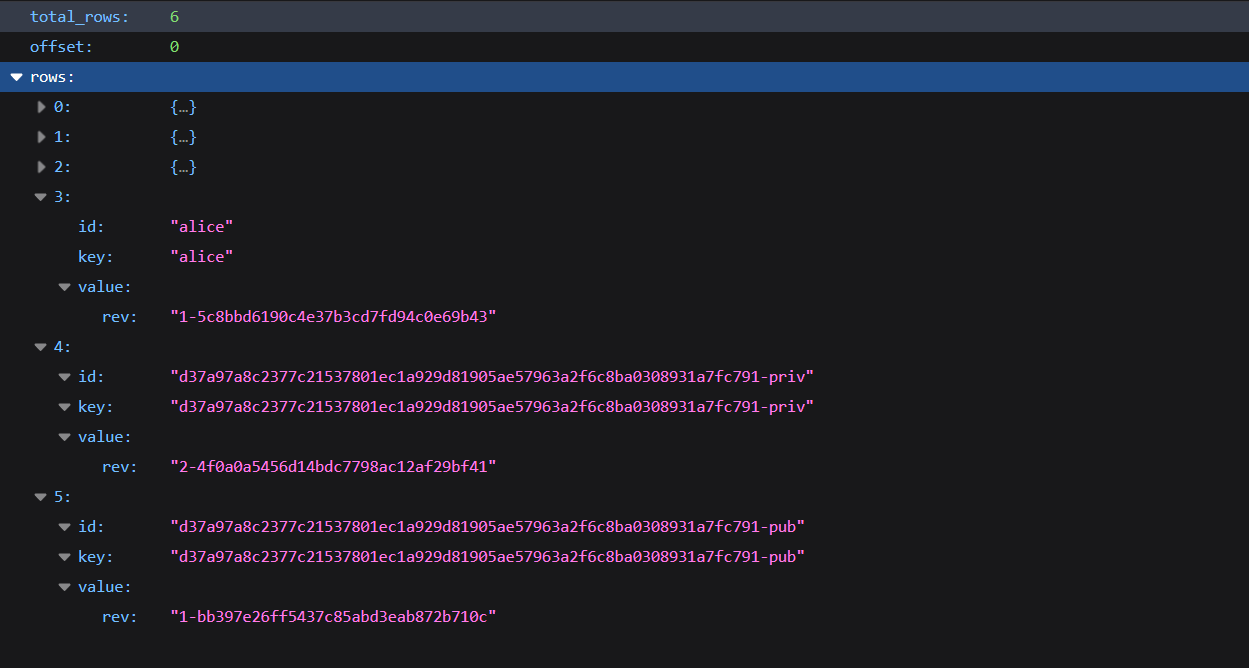
其中0#、1#、2#是admin的证书。

3#是alice保存在状态库中的证书

4#和5#是alice保存在密码学资料库中的公钥和私钥

访问http://localhost:5369/org1db/alice,可以看到alice在状态库 中的全部细节:

Fabric CouchDB钱包

查看signingIdentity

1
"signingIdentity":"d37a97a8c2377c21537801ec1a929d81905ae57963a2f6c8ba0308931a7fc791"

现在查看上图中的4#和5#,可以看到是一样的。

可能你还记得,signingIdentity字段是指向保存在密码学资料库中的私钥和公钥的。


原文链接:Store Hyperledger Fabric certificates and keys in CouchDB

汇智网翻译整理,转载请标明出处